Draft Feature
(Neutral Plane, Parting Line, and Step Parting Line Draft) 
IronCAD 8.0
Key New Features
Getting Started with IronCAD 8.0
This document contains some of the new features in the IronCAD 8.0 release. "Show-Me" tutorials have been provided with this documentation that will walk through simple examples of the new functionality. "Show-Me" tutorials are visually rich, yet extremely compact movie files, which transform static text help files into vivid product demonstrations. Each "Show-Me" opens in its own unique Flash enabled browser window (requires Flash Player plug-in). Click on the following link in order to test your browser for Flash support: Flash Test. The following "Show-Me" tutorials will begin to play automatically once you select the "Show-Me" icon. Additional controls in the "Show-Me" can be used to pause, stop, fast-forward, and rewind.
Draft tapers faces using a specified angle on selected faces in the model. Once Draft is applied to a part, a draft feature will appear in the scene browser for reference and editing. Draft can be applied to solid or surface models. The following types of draft types are available:
Neutral Plane: The Neutral Plane Draft is the basic form of draft. Draft is created by selecting a plane to draft from and the faces to apply the draft. The Neutral Plane selection can be existing faces (in which the user can make the Neutral Plane attached to the face so if the face changes position, the Neutral Plane will update its position) or the user can select point or datum planes to define its location. The TriBall can be used to position and orient the plane to the desire location.
Parting Line: The parting line option lets you draft surfaces around a parting line. The parting line can be non-planar. To draft on a parting line, you can first divide the faces to be drafted by inserting a split line (using the Split Face Command), or you can use an existing model edge. Once the parting line is determined, enter the Draft command. Specify the direction of pull, or the side of the parting line from which material is removed (this will look and act similar to the Neutral Plane). Then select the parting line curves and determine the direction of the draft by selecting on the displayed arrows.
Step Parting Line: A Step Parting Line Draft is a variation of a Parting Line draft. The step draft creates one face rotated about the plane used as the Direction of Pull. This results in small faces, representing the steps. To apply the Step Parting Line, follow the same steps as the Parting Line command.
How to - Select the Draft Face Command in the Modify Menu (or the Face/Edge Edit Toolbar). Select the type of Draft to be performed. Select a location for the Neutral Plane or Pull Direction. Select the faces to be drafted or select edges defining the parting line. Use the Face Selection drop-down list to help aid in the face selection and use other options if needed to help define the draft like Reduced Angle or Perpendicular Step Draft. Enter the Draft Angle and Select "OK" to complete the operation.

Draft Face Types
Additional options are available in the Blend Command to help aid in more advance blend types. User can now add Face-Face and Full Round Blend Types to solid or surface models.
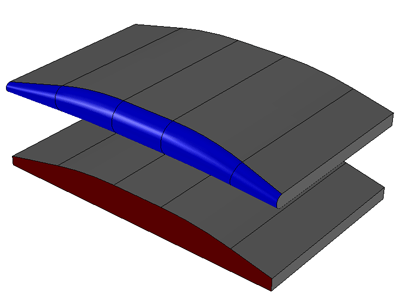
Constant and Hold Line Face-Face Blend: Blends non-adjacent, non-continuous faces. Additional control options are available to aid in the blend generation like Hold Lines, Help Points, Continuous Curvature, and Constant Width. Hold Lines determine a boundary of the Blend to follow (Hold Lines can be edges or split line edges). Help Points resolves an ambiguous selection when it may not be clear where the face blend should occur (Example would be adding a Face-Face Blend to a Half Circle Shape where a user would only want to blend one edge). Click on Help Point, then click a vertex on the side where you want the face fillet. A fillet is created at the location closer to the Help point. Constant Width will create a blend between two faces maintaining a constant width (Hold Lines are not available in this option). Continuous Curvature creates a blend that maintains the curvature along the blend and the Hold Lines (Continuous Curvature is not available for Constant Face-Face Blends)..
Full Round Blend: Creates fillets that are tangent to three adjacent faces sets (with one or more faces tangent). Essentially, the full round will create a blend from a top face to a bottom face while eliminating the center face defined in the three adjacent face set.
How to - Select the Blend Command. In the Type drop-down list, select Constant Face Blend, Hold Line Face Blend, or Full Round. Select the desired options and complete the blend. Use the available options to help aid in blend creations like Constant Width, Continuous Curvature, or Help Points.
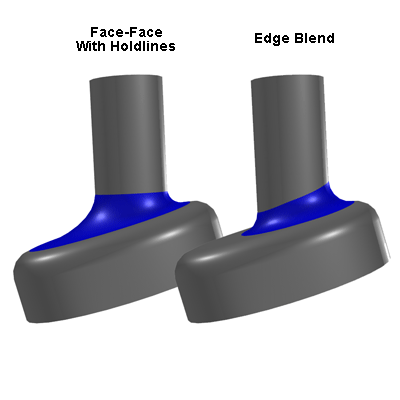
Face-Face and Full Round Blends
The Split Face Command projects a sketch (2D profile, existing edge, or 3D curve) to selected faces. It divides a selected face into multiple separate faces, enabling you to select each face. The Split Face Command can project onto a solid or surface body. The Split Face can create the following types of lines used in the split operation:
Projection: Projects a sketch line onto a face/surface and splits this element into multiple sections defined by the projection line.
Silhouette: Creates a split line on a cylindrical part using the parts silhouette defined from a reference plane or face orientation.
By Part: Create a split line by using a second part. Similar to a Split Part command, a user will select two part and select the split command. The second part selected defines the split line on the first part.
How To: Select the Split Face Command from the Modify Menu or the Face/Edge Edit Toolbar. Select the desired split type operation. Select the Face to Split and the Curve to use as the Projection (or Select a Placement Point to Define the Direction for the Silhouette Projection). Use the TriBall to define the Direction of projection for the split and select "Go" to complete the command. For Split Line By Part, select two parts (the first part selected will be the part accepting the split line.).
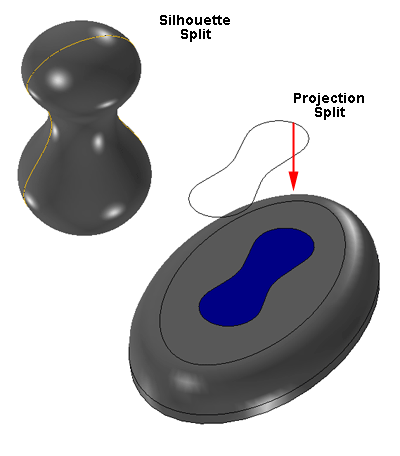
Projection, Silhouette, By Part Split Face
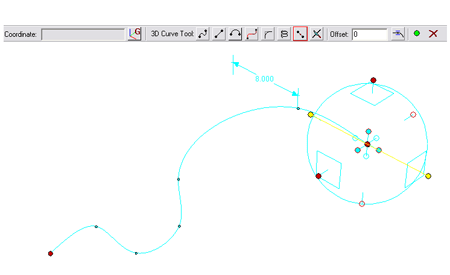
The 3D Curve creation has been enhanced to allow the user to use the TriBall for precise placement of points. Using the TriBall, a user can move to the desired location and place the control point for the 3D Curve to pass through. This allows the user to have a powerful visualization and reference tool to the coordinate system without the need of knowing exact placement points.
How To: Select on the 3D Curve Command. Select the desired Line Type to create. Turn on the TriBall. Move the TriBall to the Desired location and Select the Place Point Option to locate a control or endpoint for a line. Continue repeating the process until the desired curve is created. Select on the TriBall or select on a different Line Type to Exit the command.
3D Curve Creation Using the TriBall
A new toolbar is available for Snap Point Options when working with the 3D Curve. Users can enable the toolbar which has snap options like Point, Center Point, Intersection, and Midpoint. The Snap Point Options allow the user to reference near the desired option without having to select precisely on the desired location like the current IronCAD Snap. In future releases of IronCAD, the Snap Point Options will extend into other areas like 2D Sketch and 2D Drawings.
How To: Start the 3D Curve Creation Command. Select the desired curve line type. In the Point Snap Options Toolbar, select the type of Snap desired. Move the cursor onto an existing 3D Curve to activate the snap control. When the Snap Highlight is displayed, left-click to accept the snap. The cursor position does not need to be directly at the desired snap location, it just needs to be near the location to see the highlight.
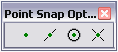
Point Snap Options
New options are available for users to split a 3D Curve using references like other 3D Curves and geometry. This allows users to create extended 3D Curves or use imported curves with the ability to modify the design by splitting the curve to the desired locations. After the split operation, the user can delete the segments no longer needed in the design or use the remaining segments in other commands like surfacing.
How To: Enter the Edit 3D Curve Command or 3D Curve Creation Command. Enable the Split Curve Command from the 3D Curve Ribbon Bar. Select the curve to trim and then select the curve or geometry to act as the trim entity. This will split the curve into segments that can be deleted or referenced in other commands like surface commands.
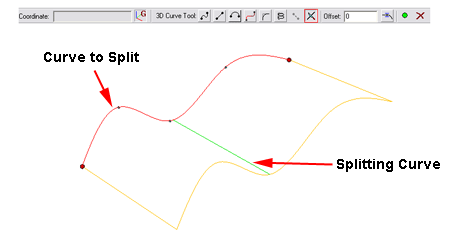
Split 3D Curve
Control handles are available on all control points on the 3D Curve Spline. This will allows users additional editing capabilities to control the tangency and magnitude along the spline. In addition, users can right-click on the handles to access alignment control options.
How To: Edit an existing 3D Spline Curve. Select on the curve so that it is highlighted yellow. At each control and endpoint, handles will be displayed. Left-click and drag on the handles to adjust the magnitude of the tangency. Right-click on the handles to access available options. One a handle has been modified, it will be locked to maintain the desired setting for the handle.
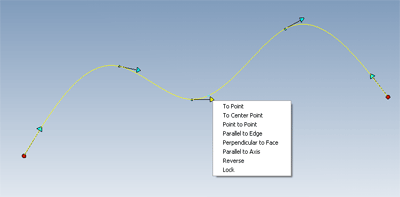
3D Curve Spline Control Handle Options
The 3D Curve Command has added the ability to create a 3D Helix. This curve can be used in conjunction with the Sweep command to create custom defined helix path curves. Options are available on the Helix Curve to change its position and Direction.
How To: Enter the 3D Curve Creation Command. Select the Helix Command from the toolbar. Select a location in the scene to define the center location for the helix. Enter the desired setting for the helix in the pop-up dialog and hit ok. Drag the Center Point of the Helix to change its position or drag on the Start Handle to change the starting location. Select on the Helix Curve and right-click on the Center Point handle to access orientation options of the Helix. Right-click on the Helix Curve (when selected and highlighted yellow) to access the creation properties dialog.
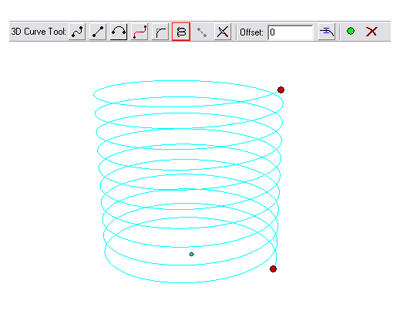
3D Curve Based Helix
Surface Enhancements
A new surface creation type has been added to create a surface from multiple selected curves. The Patch surface works similar to a Edge Surface, however it can contain any number or edges that define the closed boundary (1 Curve minimum and unlimited Maximum). In addition, the Patch Surface can set tangent or contact settings when selecting existing edges of a surface when being added as an IntelliShape of the surface.
How To: Select the Patch Surface Command from the Surface Creation Toolbar. Select the reference point for the Surface Anchor (Select on an existing surface to access the option to Add as IntelliShape). Select the edges to be used in the Patch Surface (The edges must make up a closed connected set of curves. Control Curves for the Patch Surface are not supported in this release.). Use the options on the Toolbar to determine if the edge is tangent to the existing surface (if added as IntelliShape). Select "OK" to complete the command.

Patch Surface Creation
User are now able to create a single surface shape by selecting multiple faces on different parts when selecting "Create Surface Shape" in the right-click pop-up menu. A pop-up option will appear to allow the user to stitch the selected faces into a single surface. This single surface can be used to create an additional surface or used in Split Part/Split Face operations.

Multiple Part Surface Creation
Users can create a surface fillet using a single surface and a curve. The user can control the radius value used between the Surface and the Curve. This fillet creation tool allows users to create fillets when it may not be possible to create fillets through traditional blend or fillet commands.
How To: Create a surface and a curve to be used as the end of the fillet. Select the Fillet Command from the Surface Creation Toolbar. Select Surface to Curve in the Type drop-down list. Select the Surface to be modified. Select the Curve to use as the Fillet Reference. Select on the surface to the side in which you wish the fillet to curve up from. Enter the desired Fillet Value and select "OK" to complete the command.

Surface to Curve Fillet
Users can create a surface fillet using two surface and a curve as the defining fillet edge definition. This allows for more complex fillets on surfaces that may not be possible through a variable fillet command. This command is similar to the Face-Face Blend with Hold Lines.
How To: Create a surface and a curve to be used as the fillet shape (the curve must reside on the surface). Select the Fillet Command from the Surface Creation Toolbar. Select Fillet by Curve in the Type drop-down list. Select two faces to fillet between and select on the arrows to define the direction of the fillet. Select the curve to be used as the fillet shape. Select "OK" to complete the command.

Curve Generated Fillet on Surface
IronCAD 7.0 introduced the ability to create conical sheet metal parts. IronCAD 8.0 extends the conical sheet metal to allow users to add stock and bends to the conical sheet metal with the ability to unfold. Punch operations are not supported across the conic and stock connection.
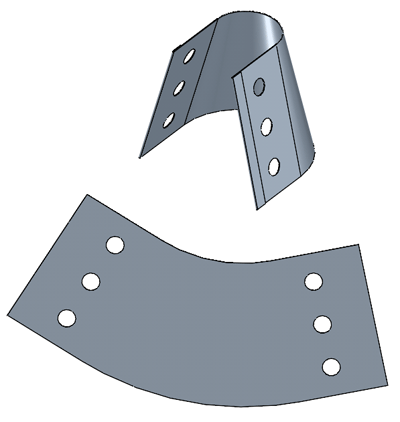
Conical Sheet Metal with Add Stock
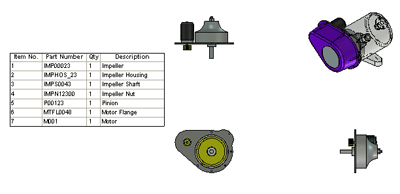
IronCAD drawings now support configuration based bill of material (BOM) tables. Users can create scene files that have multiple configurations used in the drawing layout to denote specific parts or assemblies. The BOM can be created based on the specific configuration along with the Item Bubbles referring to the Configuration Based BOM. This can allow users to have a single file and drawing without external linked files usually needed to represent the various BOM configurations. In addition, the BOM can support suppressed part counts based on the configuration.
How To: Select on the Create BOM from the Drawing Annotation Toolbar. Select the desired scene file and its configuration to be used in the BOM. Select No Configuration Selected to create a BOM that will count all assemblies/parts in the scene even if they are suppressed (This is the behavior used prior to IronCAD 8.0). Place the BOM on the drawing. Use the Item Bubble Tool to place items in the views. The Item Numbers will generated based on the configuration in the view if there is a corresponding BOM on the drawing for that configuration.
Configuration Based BOM Support
IronCAD drawings can know support multiple standard view sets on a single sheet. This will allow a user to create standard view sets of different parts while maintaining the alignment capability of the standard views.
How To: Select the Standard View Creation Tool from the View Creation Toolbar. Select the Scene to be used and the desired views and front view orientation. Select Ok. Use the cursor to place the view in the desired location. Repeat the creation process and select a different scene or configuration during the view creation.

Multiple View Sets on Single Sheet
General View creation has an additional option to allow creation of a Perspective View for Illustration. Once the view is created, users can set the view to Shaded with Textures, Shaded, Facet, or Wireframe Rendering. This view is for illustration, therefor certain annotations and commands cannot be applied to the view.
How To: Select the General View Creation Toll from the View Creation Toolbar. Select the option "Create Perspective View for Illustration" at the bottom of the dialog. Select Ok to place the view. Right-click on the view for Rendering display options.
Perspective View for Illustration
Selection options have been added to allow the user to select views that overlap. Using the Shape Menu options like Bring to Front, users can send views forward and backwards in the page to allow selection of the desired view.
With the addition of the Zoom to Cursor and Pan Sheet options added in IronCAD 7 Product Update 2, allowing the user to work with sheet geometry outside the sheet has become a requested item. User now can create the geometry outside the sheet with new camera options to Fit to Extents and the Zoom Options updated to zoom off the sheet.
New capabilities have been added to the Detail View Command to allow the support of Details of Details. This enhancement helps reduce the time creating special views needed to represent desired geometry.
How To: Use the Detail View Command from the View Creation Toolbar to create detail views. Select within an exiting detail view to create a detail of a detail view.
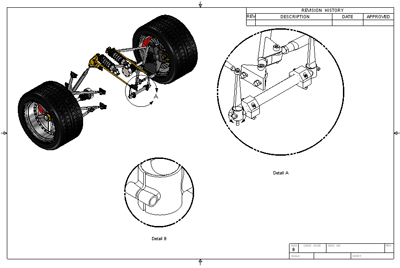
Detail of a Detail View
The Non-circular Detail View Command has been added to allow users to create details based on a closed boundary defined area. Similar to the Crop View capabilities, a user can create a closed profile using the 2D Drawing Geometry around view geometry to define a detail view.
How To: Select the desired view in which a Detail View will be added. Select the Non-Circular Detail View Tool from the View Creation Toolbar. Use the 2D Technical Drawing Tools to draw a closed boundary defining the detail area. Select "Ok" from the Detail View Creation Ribbon Bar. Place the Detail View in the desired location. To Edit the Detail View Curve, Right-click on the view containing the detail defining boundary and select "Edit Detail Line".

Non-circular Detail View Creation
Increasing the support for additional drawing standards, the Detail View callouts have been updated to support additional placement standards. User can create a callout using a line connection between the boundary shape and the detail shape to denote the connection.
How To: Right-click on the Detail View Indicator Circle and select Properties. Select the desired placement type for the Text indicator and select "OK".

Detail Text Placement and Connectors
A Hot-Key has been added in the when moving 2D Geometry or Creating Geometry in 2D or 3D Profile to lock the movement in the Horizontal and Vertical directions. Using the ALT Key, the movement in the drawing will be locked to the horizontal/vertical direction for simple placement control or to aid in drawing creation. In the 2D Drawing, this Hot-Key will work for View Positioning and Annotations as well.
How To: Left-Click and Drag on a 2D Profile Curve, 2D Drawing Curve, View, or Annotation. Hold down the Alt Key to lock the movement to the Horizontal/vertical directions. Use other hot-keys in conjunction with the Alt to position the selected geometry (like using the Shift Key for Snap Options).

Horizontal and Vertical Controlled Movement
New options for sheet curve geometry have been added to help aid in template or geometry creation. Users can create multiple line segments in the drawing and join segments into a single segment group. In addition, users can un-join segments that may have been connected not by desire. This capability allows user to create complex groups of geometry that can move and edit together for needs on the drawing.
How To: Select two curves. Right-click on the Curves and select Join Shapes (or Unjoin Shapes). During creation, users can control if curves join automatically by changing the setting in Tools/Options/Interactions under Merge Curves.
Standards Support for a underline separator between the View Name and Scale has been added as an option in the View Property page.

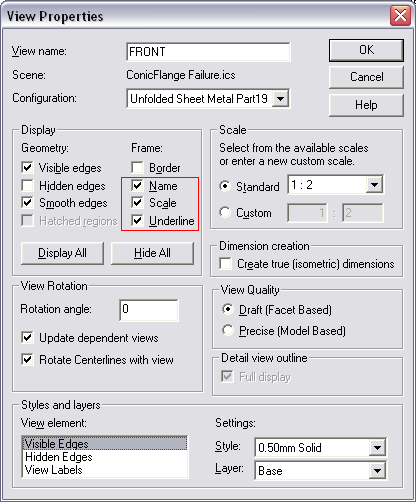
Underline Between Name and Scale
New options have been added to the Print Dialog (as well as the PDF Export Dialog). Print Range will allow user to specify printing of All Sheets, Current, or a specified range. In addition, options to print with zero-width line display or print view out-of-sync indicators are available for easy access instead of accessing at the sheet property level prior to print.

Additional Print Options Available
Enhancements have been made to allow user to hide selected or all unselected shapes in the scene. This option will allow a user to work with the needed geometry while hiding the rest until requested to Unhide. This will offer performance improvements in large files by eliminating the need to draw all components during the design.
How To: Select on the desired assemblies/parts to work on with. Right-click on the selected and select Hide Unselected. When modifications are complete, Right-click in the background and select Unhide All to display the all the components. The Hide State of parts/assemblies is not indicated in the scene browser and is not reflected in Preview Images or Drawing Creation. The Hide states are temporary states and are not saved with the file (Use Suppression States for these types of desired options).
IronCAD 8.0 has been updated with the latest versions of ACIS and Parasolid. IronCAD continues to be the leading technology by allowing dual support for both kernels. The benefits include seamless data migration and kernel collaboration to create geometry that may not be valid in a single kernel individually.
IronCAD 8.0 has been updated to support the 1.12.4 version of DWGDirect Import/Export Translator for AutoCAD DWG/DXF. This version has many quality issues addressed that will help aid in better translation for IronCAD users.
IronCAD 8.0 now has available options to import and export the CATIA V5 file format. Parts and Assemblies can be imported and exported. Users can choose to add an Import or Export capability to IronCAD as a standlaone add-on module. Please contact IronCAD or your local IronCAD Reseller for Pricing Options.
New Box Select Selection Control has been added in both the 3D and 2D environment. Box Selection from Left-to-Right will select all items contained within the box boundary. Right-to-Left will select items that intersect or touch the box boundary. This selection will allow for greater control in selecting desired items.

Box Select Direction Control
New Face Highlight in the 3D Scene has been added to help aid in general selection. The Highlight helps distinguish between Face and Edge selections in commands where the selection may overlap or may be difficult to determine.

Face Highlight
IronCAD 8.0 has upgraded its current 3D solving system. This upgrade will enhance the results in the current sequential solving method plus extends the capability to support cyclic dependency solutions (Where dimensions between parts create a cycle). In addition to this upgrade, a simultaneous solving mode (inverse kinematics) is available which offers bidirectional solving during Drag or TriBall Operations. The mode does not allow editing to geometry, so when you exit the mode the original design model will be in it original state or users can choose to accept the solved locations for the assembly/parts. The mode will allow users to quickly determine the mechanism motion of the design without affecting the current design state of the mode.
How To: To enter the Mechanism Mode, select the option under the Tools Menu (Mechanism Mode). Users can add constraints within the Mechanism Mode or outside the Mode. If adding Constraints within the Mode, the shapes will position bidirectional to solve the added constraints where as outside the mode the constraints can only solve sequentially in one direction. Once the model is constrained, left-click and drag on parts to see the mechanism movement. Various Solving Methods are available on the Mechanism Mode Ribbon Bar to help control the type of movement during drag like Standard, Rigid, Localized, and Relaxation (Each Option is explained in the Help System). Select "OK" on the Ribbon Bar to accept the current solved position and exit the mode. Select Exit to return the model to its previous state before dragging and to exit the mode. Geometry creation and modification is disabled while in the Mechanism Mode. The Mode is primarily to be used as an aid in analyzing the motion of a constrained model. Tools like Interference Detection are available in the Mode. Use the Selection Filter and the Selection Tool to select Parts and Assemblies in the Mode for these types of operations. The Drag Mode is only supported at the Assembly and Part level (not IntelliShape). The Mechanism Mode does not support dimensions that are cross-parent or at different levels of the hierarchy (Example: Dimension from Part A in Assembly 1 to Part B in Assembly 2 are not supported). If this dimensions are created outside the mode, the Mechanism Mode will change the definition of these dimensions to be sibling only (Example: In the previous case, the dimension will be redefined to be a dimension from Assembly 1 to Assembly 2).
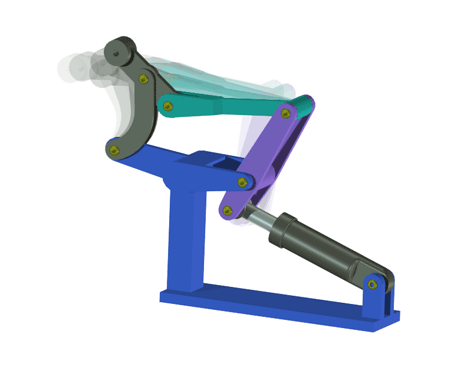
Mechanism Support
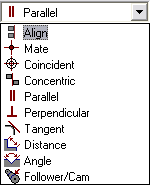
The Constraint Position Tool has been replaced with a new tool that offers additional constraint types and more options to define the constraint. This tool allows the user to determine the desired constraint prior to selecting any geometry and it will narrow the available types based on entity type selected. In addition, this tool incorporates new available types like Coincident, Tangent, Follower/CAM, and Distance/Angle.
How To: Select the Positioning Constraint Tool from the Standard Toolbar. Select the desired type of constraint from the drop-down list and then select Faces/Edges of Assemblies/Parts/IntelliShapes to create the constraint (Alternatively, select the entities first and then select the constraint type in the drop-down list that is available based on the selections made). Left-click to accept the created constraint or right-click to cancel the constraint creation. When all constraints have been added, select the "OK" button to accept the change.
Constraint Tool Options
As a special thank you to its 8.0 customers IronCAD has Included a bonus CD containing a suite of solution partner applications free of charge. Each of the applications included on the CD are fully integrated with IronCAD and have been awarded Gold status in IronCAD's solution partner program. Additional information about each application can be found on the CD. Please take the time to try them out to see how they might help improve your overall design process. The solutions included on the bonus CD are the following:
Design Discipline Application Company
FEA Design Check Algor, Inc.
DDM Design Data Manager CSI, Ltd.
CAM PEPS SolidCut Camtek, Ltd.*
Viewer ModelPress Informative Graphics
Rhino Integration IC add-on IronCAD
IC Add-On IC Add-On Progress Soluzioni
..................................................................................................................
* Due to the complexity of licensing and installation these CAM applications are trial version with the option to purchase at a special discount.