IronCAD 9.0
Key New Features
Getting Started with IronCAD 9.0
This document contains some of the new features in the IronCAD 9.0 release. "Show-Me" tutorials have been provided with this documentation that will walk through simple examples of the new functionality. "Show-Me" tutorials are visually rich, yet extremely compact movie files, which transform static text help files into vivid product demonstrations. Each "Show-Me" opens in its own unique Flash enabled browser window (requires Flash Player plug-in). Click on the following link in order to test your browser for Flash support: Flash Test. The following "Show-Me" tutorials will begin to play automatically once you select the "Show-Me" icon. Additional controls in the "Show-Me" can be used to pause, stop, fast-forward, and rewind.
Assembly Features (set as empty) and Parts/Assemblies together can be dragged & dropped into a Catalog. On drop from the Catalog, the Feature Scope Options will be displayed for the Assembly Feature and then the entire group containing the assembly feature and the parts/assemblies will be dropped. This capability will allow users the ability to drop complicated assemblies that remove material from other parts/assemblies on drop from a catalog (Example would be a window frame drop onto a wall or frame members).
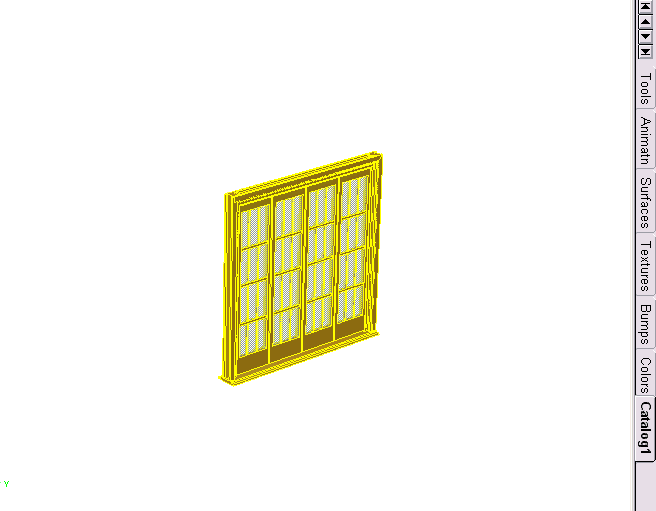
Assembly Feature Group Example
Design Variations allow users to build variations of an assembly/feature/part using the existing parameter capability. These variations are stored with the shape and the shape can be reused through Insert or through the catalog. During Catalog drop, the design variations dialog will display to allow the user the ability to select the desired variation for the shape. Using the Smart Assembly capability, users set the variation to use at the time of drop and then the assembly can SmartSnap into position. In addition to parameter information, you can set the part name, part number, description, part color, and custom properties when available.
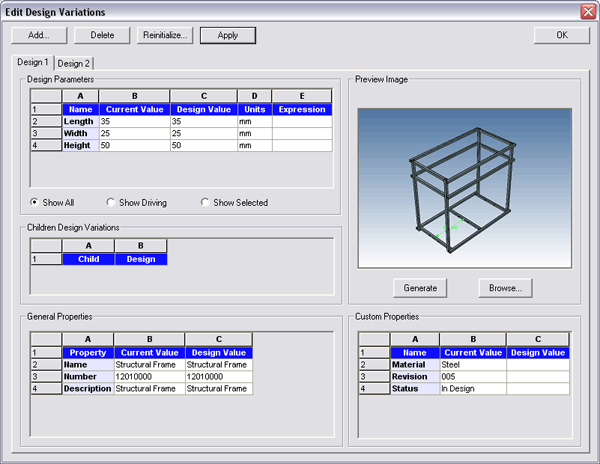
Design Variations Edit Dialog
Smart Assembly allows users to create intelligent positioning of components on drop from the catalog or on drag in the scene environment. With the use of Attachment points, users can assign Names to the attachment points. During the drag of components or drop from the catalog, shapes will evaluate the nearest attachment point and apply the smarts to the component for precise drop positioning.
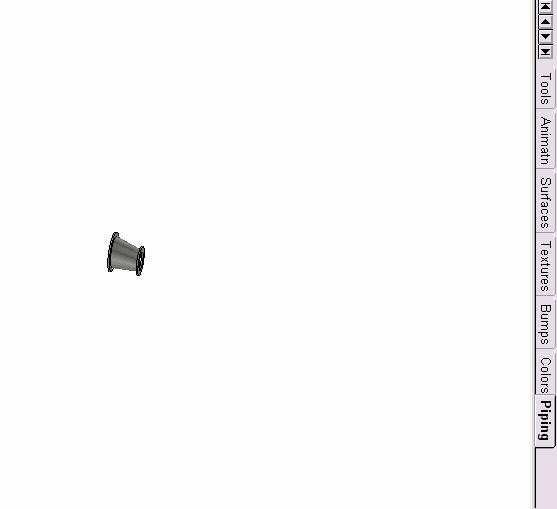
SmartAssembly Example
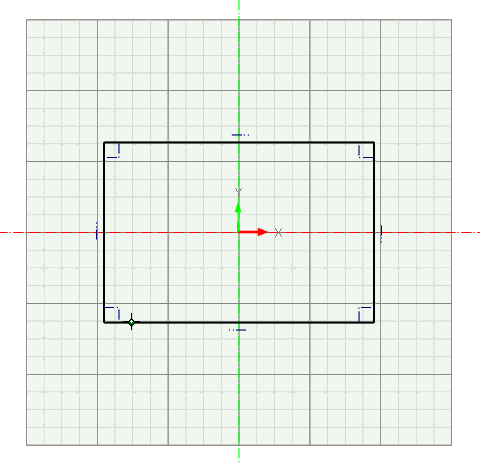
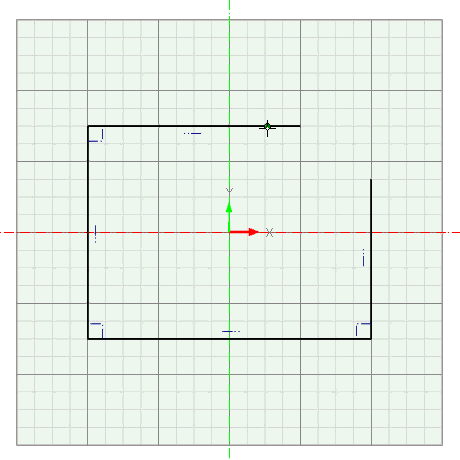
The IntelliStretch Command allows user to stretch parts/assemblies based on the Sizebox of the part/feature. You are able to define a stretch location and parts that intersect the stretching plane location will stretch while other parts located in the stretch direction will move. This command allows you to quickly stretch an assembly or series of parts that make logical sense to be able to stretch. Examples of this would be Cabinets, Machine Frames, Structural Frames, etc.

Stretch Example and Toolbar
Parameter support for Blend (Constant, two-point variable, and Face Blend), Chamfer, Shell, and Draft have been added to aid in the parametric capabilities of IronCAD. In the command bar for these shape types, users can directly add the blend and its value to the parameter table (Ex: Entering B=0.25 means create a parameter named B on the shape with a value of 0.25). Once the parameter has been added to the parameter table, current editing capabilities in the parameter table can be performed.
The Shell command has been updated to support the ability to shell inside, outside, and in both directions. These options strengthen the shell command capabilities to meet the design needs of users.
Shell Command Direction Options Example
A Boolean Toolbar has been added for quick access to the boolean commands. In addition to the toolbar, additional boolean types are supported such as Union, Subtract, and Intersect.
Users can now create Spot and Point Lights associated to Assemblies. This capability allows the lights to position with the assembly and allows the lights to be stored in the Catalog with the assembly for later use. Catalog support enables users to create pre-defined lighting scenarios for assemblies when dropped in scenes.
Using the Datum Plane capabilities, users can now define an active local coordinate system. This Local coordinate system can be positioned and referenced in model/curve creation based on its coordinate location.
The Parameter table has been updated to include a Preview/Apply capability. By default, preview is set to update the scene when changes are made inside the parameter table. De-selecting the Preview options, will allow the user to make changes in multiple fields and hit apply when the desired modifications are performed.
New Creation Types
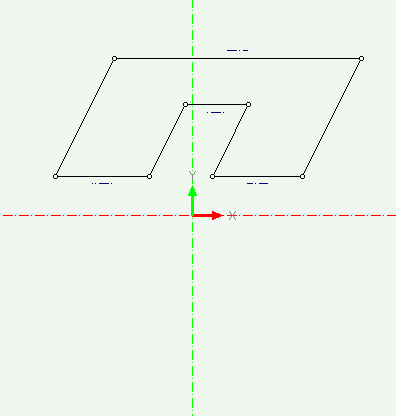
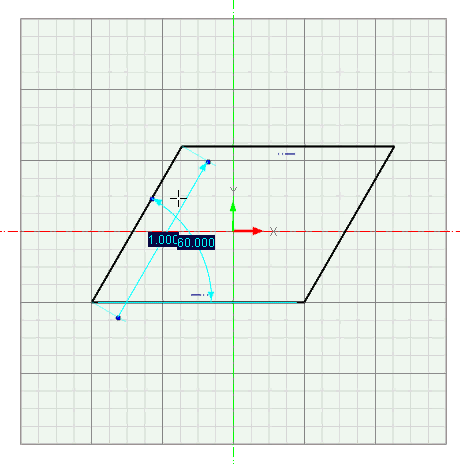
3-Point Parallelogram - 3-Point Parallelogram creation is now available in the 2D Sketch/Drawing environment. User are now able to create a 3-Point Parallelogram based on selection or by right-click input options. Right-click options are available for the second and third placement point for Length, Slope, and Width.
3-Point Parallelogram Example
Polygon - Polygon creation is now available in the 2D Sketch/Drawing environment. During creation, use the "Tab" key to toggle between Inscribed and Circumscribed Circle based polygon and use the "Up" and "Down" key on the keyboard to change the polygon number. Right-Click on the second placement point to get a pop-up dialog with type, number, and circle radius options.
Polygon Creation Example
Ellipse Creation Example
Elliptical Arc - Elliptical Arc creation is now available in the 2D Sketch/Drawing environment. Users are able to place the center point, major radius, minor radius, the start location for the arc, and the arc end. Right-click options for the Major Radius, Slope, and Minor Radius are available on the second and third placement point.
Elliptical Arc Creation Example
Chamfer Creation Example
Two Line Segment Fillet Example
Polyline/arc Command Example
Updates in the 2D Sketch Snap Feedback have been implemented for clarity in the sketch and to add additional Snap Feedback capability. Visual clarity has improved by changing the appearance of the feedback and allowing users the ability to get feedback for specified entities. In addition, perpendicular feedback to lines has been added to aid in the construction of geometry.
2D Profile Snap Behavior Example
2D Curves and 3D Curves can now be projected onto a sketch plane using the projection tool (Association projection is not supported for these types).
Updates to the Input Coordinate field in the 2D Sketch to allow users the freedom to input in their commonly used manner. Example: Users could input 0 0 or 0,0 depending on their preference.
The Horizontal/Vertical Constraint tool has been updated to maintain the curve length when setting the constraint. In the previous version, these tools would project the curve to the Horizontal/Vertical position versus maintaining the length and positioning to Horizontal/Vertical.
Horizontal/Vertical Constraint Update
Right-click pop-up options are now supported on the two-point and three-point circle command during the final pick placement of these 2D Curve types. This gives users additional control during creation to specify radius and direction values.
Users can now use the TriBall to Copy/Link along a 3D Curve. This tool will give the user the ability to input the number of copies and will copy along the curve maintaining the shapes orientation. Options are available to set evenly space copies and to allow the shape to orient along the curve (Orients the X-axis to the 3D Curve. If the curve resides on a surface, the Z-axis of the shape will be normal to the surface in addition to the X-axis orientation to the 3D Curve). This option is a one time command with no association to the 3D Curve.
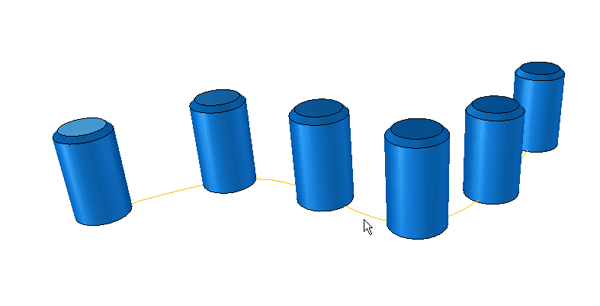
Copy Along a 3D Curve Example
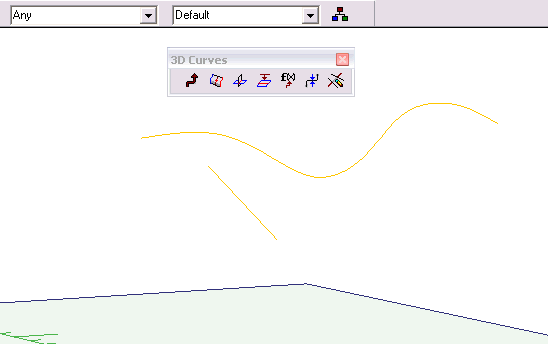
During the 3D Curve Creation/Edit, users can insert/import points as reference points in the 3D Curve Shape. Display options can be set to display only inside the 3D Curve Edit Mode or outside the edit mode for reference in other 3D Curve creations. These points do not effect any operation that use 3D Curves since they are only used as reference points.
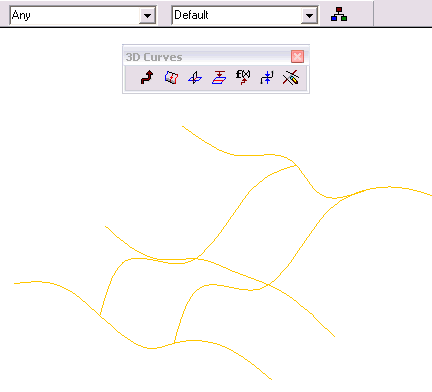
Multiple selected 3D Curves can be joined into a single smooth curve to aid in surface creation from edges.

Merge Curve Example
3D Curve Text import now supports header information in the text file to create Splines, Lines, and Points. This capability allows a user the ability to import a single data text file defining a curve containing multiple segment types. To import points for a 3D Curve, start the 3D Curve command and select the desired import type under the 3D Curve pull-down menu (Import as Spline, Import Reference Points, or Import Header Defined).
Import Header Format:
Import Text File to 3D Curve with Header Information (Line, Spline, Point). the data file is *.dat.
Point Format:
POINT
x1,y1,z1
x2,y2,z2
&.
xn,yn,zn
Line Format:
LINE
x1,y1,z1
x2,y2,z2
&.
xn,yn,zn
Spline Format:
SPLINE
n
x1,y1,z1
x2,y2,z2
&.
xn,yn,zn
EOF
(x1,y1,z1)、(x2,y2,z2)、&(xn,yn,zn) are coordinate points and (n) is the number of points in the spline. The data can be tab, space, or comma delimited.
Users can trim 3D Curves based on projection. Selecting two curves and a plane to use as the projection plane, the 3D Curve can be trimmed based on the projection. This command is used in cases where the 3D Curves do not intersect but need to be trimmed based on two curves locations.
Trim Curve by Projection Example
Trim/Split by Edge/Curve/Surface/Point
Similar to the current Split 3D Curve, the Trim 3D Curve will select two curves and remove the trimmed curve segments. Users can determine if the curves should be trimmed or split by selecting the option on the command. In addition, user can trim/split curve based on a point versus selecting two curves.
Trim/Split 3D Curve Example
The "Shift-Pick" option on the 3D Curve creation to make the endpoint of the curve perpendicular to the picked surface has been updated to work for both the endpoints of the curve and the control points of the spline. This improves the creation capability to make multiple pick point perpendicular to surfaces during the creation mode. In addition, holding the shift key and selecting on a point along another curve that resides on a surface will allow the new curve to become normal to the surface at the point along the selected curve.
A new right-click option on the 3D Spline Curve has been added to make the handle parallel to the end of another curve. This option is useful to make curves parallel at the start and end locations. After selecting the option, select at a point closest to the end desired to align parallel to.
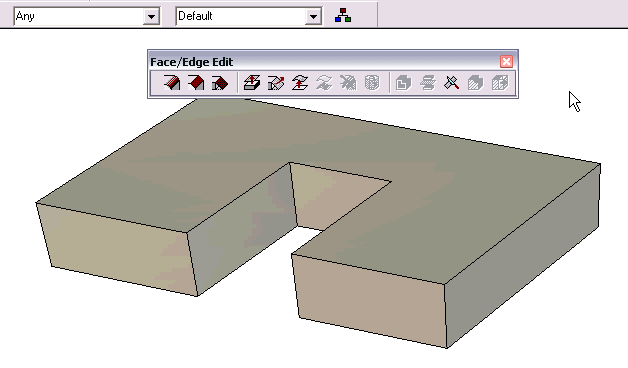
Updates to the surface creation for adding surfaces to existing surface parts have been made. Users now can select the "Add as IntelliShape" option at any time and select the surface part to add under. This eliminates the necessary first pick point on an existing surface requirement currently in the surface creation. In addition, it eliminates an unnecessary mouse click when creating surface parts only.
2D Curves can now be selected in the surface commands. When the surface command creates the surface shape, the 2D Curve reference edge will automatically be converted to a 3D Curve in the edit mode of the created surface.
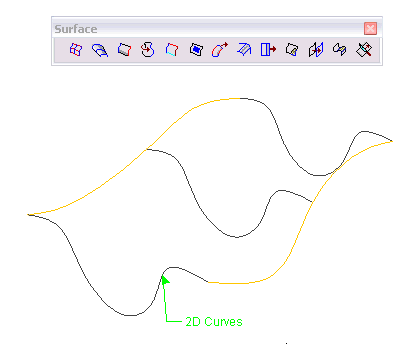
2D Curves Used in Surface Creation Example
A new option in the Ruled Surface command to create a surface from an edge to a specified point has been added. This command is useful when you only have a point and a edge that can define the needed surface.

Ruled Surface to Point Example
To Surface
A new option in the Ruled Surface command to create a surface from an edge along a direction to a specified surface has been added. This is useful when you do not have a second edge to select or do not know what the second edge should look like and you want it to match the curvature of a surface.
Ruled Surface to Surface Example
A new surface option to create an offset surface has been added. Users can create a non-associate offset surface part or a associative offset IntelliShape surface where it is associative to the original selected surface.
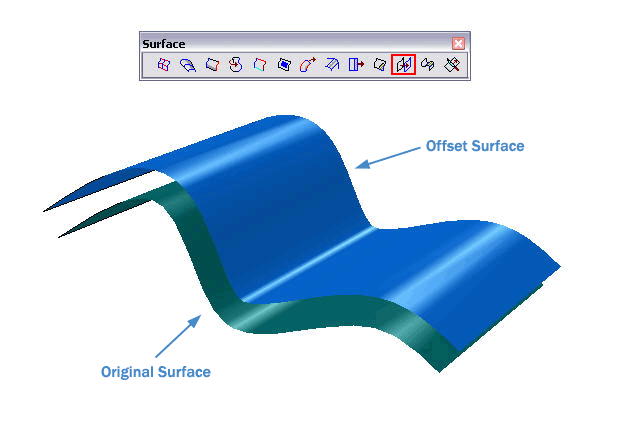
Offset Surface Example
This new merge surface option allows a user to create a single smooth surface from two surfaces. Additional options will allow the user to keep the first selected surface definition intact while modifying the other to make the smooth connection.
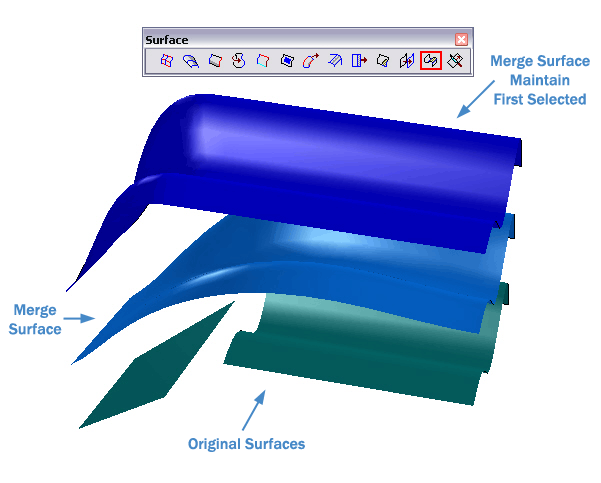
Merge Surface Example
User can now create a Fillet that is created between two surface parts. This command will create a new part that incorporates the fillet and the two trimmed surfaces without maintaining any IntelliShape information. This command is primarily used when creating a fillet between two intersecting surfaces.

Fillet Surface Example with New Options
New options have been added to the trim surface to keep the trimmed surfaces as separated parts. Currently, the two surfaces selected for trim will result in a single surface part with the trimmed surfaces as a feature. Users can know create a surface to trim multiple surfaces and select the option to maintain the surface as a unique surface.

Trim Surface Example
Closed looped UV Mesh surfaces are now allowed in the creation. Previous versions would fail to complete the surface if the U and V direction curves for a close surface.
A new surface option has been added to restore a trimmed surface. Selecting this option will create a new surface part that makes up the original untrimmed surface definition of a selected surface. For example: If you have a surface that has been cut by shape or trimmed, you can restore the original surface.
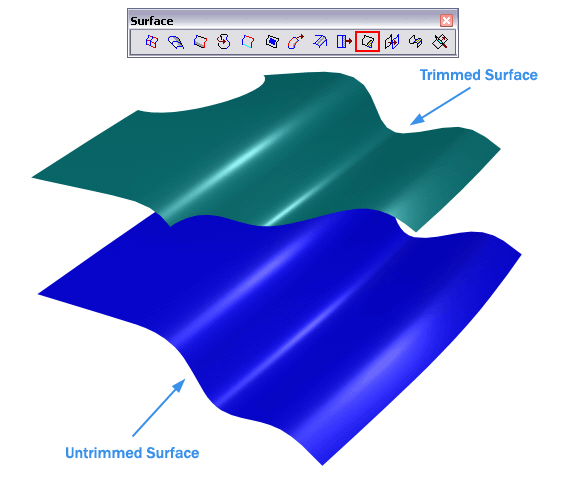
Untrim Surface Example
A Sheet Metal toolbar has been added for the commands used in the sheet metal operations (.i.e. Fold, Unfold, Cut Sheet Metal, and Closed Corner). This reduces the need to find the commands through the pull-down menus.
Sheet Metal Toolbar
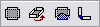
Using the existing closed corner capability in sheet metal, a new tool has been added to simplify the process of adding a closed corner. Using the new tool, users will be prompted to select the desired bends and then choose the closed corner type (i.e. Butt, Overlap, or Underlap). The command will then modify the bend and the stock to create the closed corner condition. Closed corners can only be created on bends that share a common stock edge (i.e. miter cases cannot be created with the closed corner tool).
Closed Corner Command Example
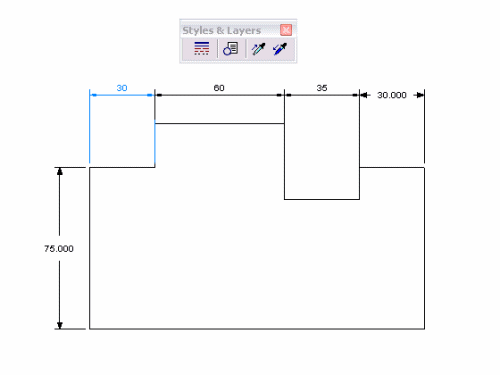
Right-click options for commonly used Style and Layer information has been added to annotations in the drawing. This quick access allows the user to make common changes to annotations quickly without having to access property pages on the annotation. Current style settings will be marked with a check mark to denote the current set style property when making changes.
Right-Click Quick Style and Layer Property Access Example
A new view option has been added to automatically dimension the view or selected area of a view. Users will have options for Ordinate, Chain, and Baseline dimension types and placement options like Horizontal Above the View and Vertical Left of View. This capability can be used to quickly add common dimensions to a view.
Automatic Dimension Example
A new global option for the drawing has been added to allow Automatic Center Mark/Line creation in drawing views. This capability is useful when the drawing view contains many circular shapes that require center mark/lines. The option can be set during creation and/or during update of views.
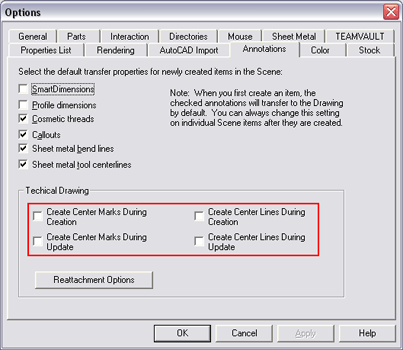
Automatic Center Line/Mark Options under Tools/Options/Annotations
A new dimension type has been added to create a Chain Dimension. Based on the Ordinate dimension capability, users can create a chain dimension that has similar options found in the ordinate dimension (Example: Align Group and Insert New).
Chain Dimension Example
During annotation of a view, a selection filter for snapping to elements has been added. Filter options include All, Geometry Point, Edges, Faces, and Reference Geometry. These options help eliminate snap highlights when working on smaller geometry and allow the user to select only the desired information.
Snap Selection Filter Example
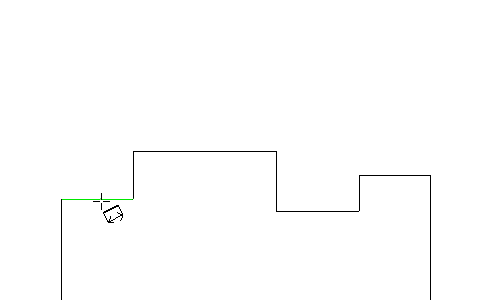
With the addition of the new styles and layers added in 8.0 Product Update 2, the need to quickly copy style and layer information from element to element was needed. A Styles and Layer Property Eye-Dropper has been added to meet this need. Left-click to collect and to drop the styles and layers from a element to the same element type. Right-click on drop to specify only drop of style or layer information.
Style and Layer Eye-Dropper Example
Snap alignment for Horizontal and Vertical dimensions has been added during the creation of the dimension. During the placement of the dimension, move the mouse to the desired dimension text/line to align to that dimension.
Snap Alignment on Dimension Creation Example
User can now select multiple dimensions when the extension lines are in the same direction and reposition the entire group. This allows for positional movements of dimensions to clear spacing issues that may occur after view updates.
Multiple Dimension Select and Drag Example
New options for drawing elements to associate to a view has been added. For example: A user can associate a Text or 2D Curves to a view. This would create an association that if the view was repositioned, the associated items will reposition as well.
Associate to View Example
A new pixel buffer option has been added for dimension text to prevent the text from moving from its current location along the dimension line. Setting the buffer to a higher number will allow the user to move the dimension along the extension lines without the text moving along the dimension line at the same time.
Text Buffer Setting on Dimensions Example
New handles have been added to the section line to allow the section line to be precisely positioned/repositioned. These handles appear on the section line and staggered segments to allow the positioning during creation and on edit. If the handles are adjusted during edit, the section view will need to be updated after the modifications.
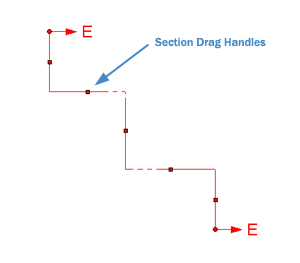
Section Handles Example
Using the new section line handles, a user can drag the section line handle to an alternate view to locate the position for the section line if this location is not available on the current view.
Item Bubbles, Text, and the Text with Leaders have been updated to snap to the grid when the grid snap is enabled. This allows for user to quickly align elements in addition to the alignment toolbar.

Item Bubble Snap to Grid Example
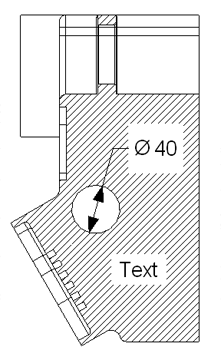
Text (Dimension text, Text, and Text with Leader) has been updated to support color masking behind the text. This allows a user to turn on a specific color mask to hide geometry behind the text (for Example: hiding the hatch lines when the text is over the hatch).
Text Mask Example on Section View
Dimensions have been updated to support single extension/dimension line settings in the styles. This can be used in cases where the full dimension line and extension line do not need to be displayed.
Dimension support has been updated to allow dimension to hidden silhouette curves in section views.
The auxiliary section line has been updated to allow input for the angle during creation and update. User can now input a precise angle input for the section line by turning on the Show Curve Dimensions when creating auxiliary section lines or during the edit of the line.

Auxiliary Section Line with Angle Dimension Support
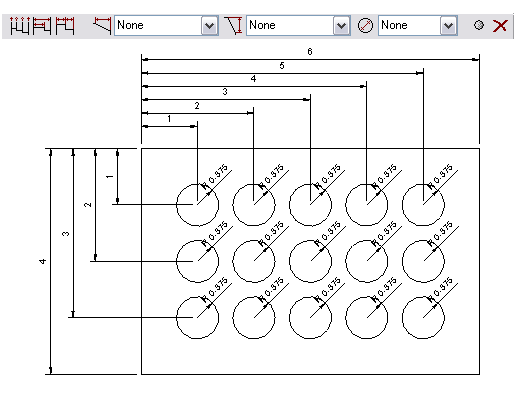
Updates have been made in the Transferred Cosmetic Threads from the scene. Areas updated include transfers to the correct projected view and support of simplified and dual callouts. The callout representation options allow user to meet standards for the layout.
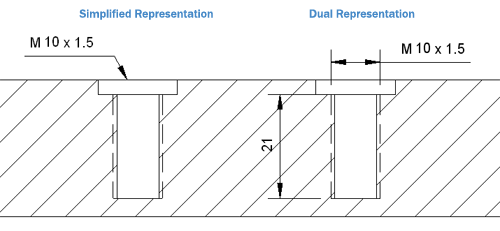
Thread Callout Representation Examples
The weld symbol has been updated to eliminate extra spacing on the symbol line when text information is added.
New options on the cosmetic thread style properties has been added to support the open location of the 270° thread type. Users can specify the open quadrant location for this type to meet the desired drawing standard.
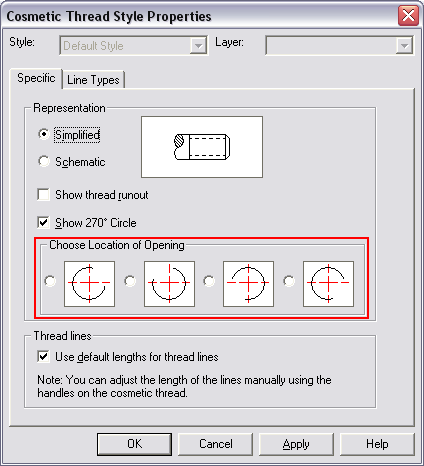
Quadrant Location Options
Copy and Paste of views has been updated to account for all annotations during the copy process. Annotations like Section and Details will request the user to determine the view to associate with instead of creating a non-associative copy of the annotation. In addition, user now have the ability to move/copy a sheet, containing the entire sheet contents, into the existing drawing by right-clicking on the sheet tab.
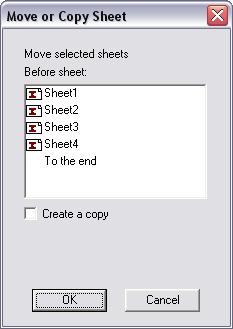
Move/Copy Sheet Dialog
Automotive JIG Manufactures has specific requirements to document 3D and 2D JIG layouts. Carline and Check Sheet functionality has been added to support this documentation need. Although this functional is a requirement in the automotive JIG, it can be useful in other industries that may have similar needs. Carline allows users to place positional markers on 2D drawing views to denote the distance from global coordinate positions. In addition to the Carlines, reference lines can be added in cases where the coordinate system may be at an angle to the JIG layout. Check Sheet functionality provides the user the ability to mark contact points in 3D and export this information to a company specific excel template where information regarding the points and the fixture position are transferred into custom fields. IronCAD has included a default template and templates for Korean Companies by default. Additional templates can be added by IronCAD by contract basis if requested.
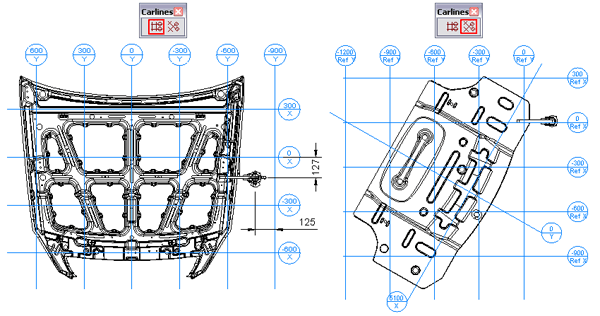
Carline and Reference Carline Examples
Development updates have been made to support Microsoft .Net development environment. This update allows new Microsoft additions to be supported in the development of IronCAD. This enhancement is part of the continued effort to make IronCAD support the latest technology standards.
IronCAD's kernels have been updated to the latest version to improve modeling operations performed in IronCAD and for data translation to/from other CAD systems. ACIS has been updated to version 16.0 and Parasolid has been updated to version 17.1.
IronCAD's translator types including the add-on options have been updated to the latest versions to increase the support for data transfer between CAD Systems. CATIA Read/Write add-on now supports version 16. The Granite Translator has been updated to version 4.0 supporting the latest Pro/Engineer and Wildfire.
IronCAD's Gold Partner CD containing a suite of solution partner applications has been updated. These updates include new versions of the solution partner products and new additions to the partner CD. Run the IronCAD Gold Partner CD for a complete list of partner applications and descriptions of the products. Below is a list of the changes to the CD:
Algor Inc. - DesignCheck - Free one-year license for FEA Part Analysis -Updated to Version 19 Service Release 1.
CSI, Ltd. - Design Data Manager - Free first license for data management needs for IronCAD - Updated to version 2006.
Progress Soluzioni - IronPRO - Add-on Tools designed for IronCAD - Updated to the latest version and a new free one-year license included on Partner CD.
Anvil SSE. - ItalaPro - New addition to the Partner CD for Interior Design powered by IronCAD. Free 180 day license included on Partner CD.
Informative Graphics - ModelPress Reader - Free IronCAD Scene (.ics) viewer - Updated to latest version.
